Avigate Navigate Communicate
SID - Standard Instrument Deperture - On Ramp on to highway
STAR - Standard Termeral Arrival Route - Off Ramp from the highway
OCS - Obsticle Clearance Surface
Free Instrument Training 01: Spatial Disorientation -
Avigate Navigate Communicate
SID - Standard Instrument Deperture - On Ramp on to highway
STAR - Standard Termeral Arrival Route - Off Ramp from the highway
OCS - Obsticle Clearance Surface
Free Instrument Training 01: Spatial Disorientation -
oday, we're diving into the fascinating world of holding patterns – a critical skill for pilots especially in your initial IFR Traning, it not only combines precision, patience, and strategy. But, it's not just about the maneuvers; it's about the stories and experiences each of you brings to the cockpit.
Holding Patterns: More Than Just Circles in the Sky, Imagine you're nearing your destination, but there's traffic congestion, poor weather, or maybe a runway is temporarily closed. That's where holding patterns come into play, keeping you safe and organized in the sky.
Understanding the Three Types of Entries:
#Direct Entry
- Situation: When the aircraft's approach path is within 70° of the holding course.
- Procedure: The aircraft turns to intercept the holding pattern and continues in the direction of the hold.
- Key Fact: Most straightforward and efficient entry, minimizing the need for significant maneuvering.
#Parallel Entry
- Situation: When the aircraft approaches the holding fix from the opposite side of the holding course, within a 110° sector.
- Procedure: The aircraft overflies the holding fix, turns outbound on a heading parallel to the holding course for one minute, then turns towards the holding pattern to re-intercept the inbound course.
- Key Fact: Used when the aircraft's approach does not allow a direct or teardrop entry, ensuring a smooth transition into the pattern.
#Teardrop Entry
- Situation: When the aircraft's approach path is between 70° and 110° of the holding course on the non-holding side.
- Procedure: After crossing the holding fix, the aircraft turns to a heading typically 30° away from the outbound course for a specified period before turning to intercept the inbound course.
- Key Fact: This method provides an efficient way to align with the holding pattern when approaching from specific angles.
#Additional Key Facts:
1. *Speed Limits:
- Below 6,000 ft MSL: 200 KIAS
- Between 6,001 ft - 14,000 ft MSL: 230 KIAS
- Above 14,000 ft MSL: 265 KIAS
2. **Timing for Inbound Legs:
- Below 14,000 ft MSL: 1 minute
- Above 14,000 ft MSL: 1.5 minutes
3. Turn Direction: Standard patterns use right turns, but ATC may instruct left turns (non-standard) at their discretion.
4. Altitude Separation: Aircraft in holding patterns are typically separated by at least 1,000 feet.
#3Essential Elements
1-Holding Fix: The geographic point or navaid where the hold is centered. Knowing your hold fix is critical for determining the rest of your holding strategy.
2-Direction from the Fix: Understanding whether the holding pattern is standard (right turns) or non-standard (left turns) and the orientation of your entry in relation to the fix.
3-EFC Time (Expect Further Clearance): This is the time you can expect to leave the hold. Always keep an eye on fuel and plan accordingly.
#Final Thoughts...
Holding patterns test a pilot's ability to visualize and execute flight maneuvers precisely. Mastering these entries is crucial for safe and efficient flying, embodying the principle of piloting with intelligence and foresight.
Remember, pilots, practice makes perfect! Keep refining these skills to ensure safe and smart flying.
Basic Components of an Aircraft and it's functions
Primary Flight Control
Wing - Flaps, Alerion
Vertical Stablizer - Rudder
Horizontal Stablizer - Elevators
Alerion Control by hand by turning clockwise or conter-clockwise of Yoke
Elevator control by hands by pulling or pushing the Yoke
Rudder control by your left or right feet on Rudder Pedals
RUDDER yaw
ALERIONS
Alerion are LESS EFFECTIVE
- At high angle of attact
- At slow airspeed
Right hand side alerion up
less lift
Left hand side alerion down
- More lift
- More drag on
- Airplane pull back
The primary controls are the ailerons, elevator, and the rudder, which provide the aerodynamic force to make the aircraft follow a desired flightpath.
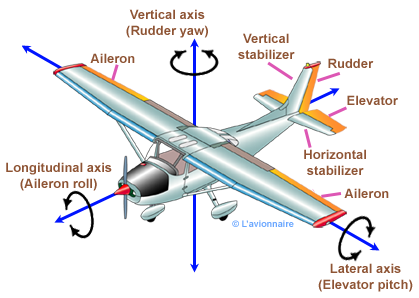

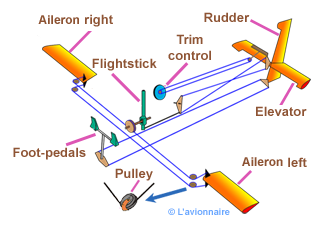
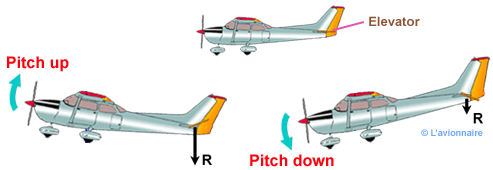
When the pilot moves the controls forward, the elevator surface is deflected downwards. This increases the camber of the horizontal stabilizer resulting in an increase in lift. The additional lift on the tail surface causes rotation around the lateral axis of the aircraft and results in a nose down change in aircraft attitude. The opposite occurs with an aft movement of the flight deck controls.
Ailerons control roll about the longitudinal axis. The ailerons are attached to the outboard trailing edge of each wing and move in the opposite direction from each other. Ailerons are connected by cables, bellcranks, pulleys, and/or tubes a control stick.
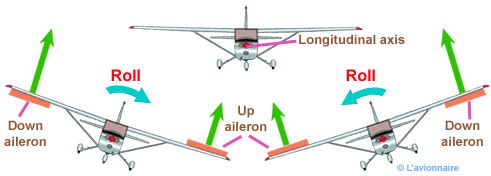
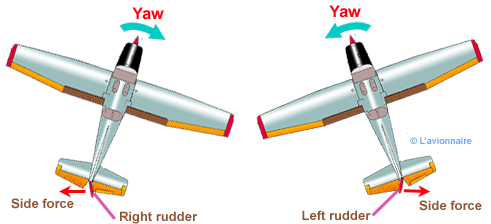
The increase in camber of the wing results in an increase in lift but this, in turn, also causes an increase in drag. This added drag causes the wing to slow down slightly resulting in rotation, referred to as yaw,around the vertical axis. To overcome this yaw rudder input is required while entering and exiting a turn. To minimise the amount of adverse yaw produced during a turn.
Descend to Land
Round Out -
Flare - aircraft continue to sink and you are pulling
Where to look
Round Out - Vison shift and look all the way down the runway
When to judge the round out
Ground Effect
Descend to land
Round out - (You're in slow flight)
Clearing Turn
Altitude
HASEL check list before stalls:
Height - 2,000'+ AGL
Area - Over practice area, farms
Security - doors, windows, loose articles
Engine - Primer, Master, Magnetos, Indicators, Carb heat, Mixture, Breakers
Look out - two 90 degree turns or one 180 degree turn
Power ON/Departure Stall
In the world of aviation, a stall refers to a critical aerodynamic condition where the angle of attack increases beyond a certain point, causing a decrease in lift. This occurs at the critical angle of attack, independent of airspeed, flight attitude, or weight. During a stall, a fixed-wing aircraft might experience buffeting or a significant change in attitude.
Imagine this scenario: Your engine is roaring, the stall warning horn is blaring, your view is filled with nothing but sky, and your plane shudders, attempting to veer left. This is the chaotic and nerve-wracking moment before a power-on stall. Many flight students wonder, "Why must I learn this?"
Why Power-On Stall Training is Crucial:
Pilots might become distracted or disoriented after takeoff, inadvertently climbing too steeply. This causes the aircraft to slow down, increasing the wing's angle of attack, and leading to an unintentional stall, which might escalate into a spin. Recognizing and recovering from a power-on stall is essential for pilot safety.
Stall Recognition Techniques:
- Vision: Noticing the airplane's attitude, though not always reliable for detecting an approaching stall.
- Hearing: Listening for RPM loss and increased airflow noise around the cabin.
- Kinesthesia:Sensing changes in motion direction or speed, a crucial indicator.
- Feel: Being aware of control pressures and feedback.
- Aircraft Warnings: Heeding horns, rudder shakers, and stick shakers.
Recovery Procedure:
Thankfully, the recovery process is straightforward. Simply fly coordinated and reduce the angle of attack. The stall horn quiets down, buffeting ceases, acceleration resumes, and the aircraft stabilizes.
Typically, you'll lose minimal altitude during recovery and should continue climbing at a predetermined airspeed once the stall has been recovered.
**Airman Certification Standards:**
1. Demonstrates comprehensive knowledge of power-on stalls.
2. Chooses an entry altitude allowing completion of the task above 1,500 feet AGL (ideally 3000ft).
3. Prepares the aircraft in the takeoff or departure configuration, setting power to at least 65 percent.
4. Smoothly transitions from takeoff attitude to the pitch that induces a stall.
5. Maintains a specific heading (±10°) in straight flight or a specific angle of bank (not exceeding 20°, ±10°) in turning flight while inducing the stall.
6. Promptly recognizes and recovers from a fully developed stall.
7. Retracts flaps and, if applicable, the landing gear after establishing a positive climb rate.
8. Accelerates to VX or VY before final flap retraction, then returns to the designated altitude, heading, and airspeed.
When is IFR need?
Stall Spin
Unusual Altitude
Partal Panel
Go no go decision
3 Key Steps in Flying IFR
1. Pitch and Power (check the Instrument you have what is needed)
verify you are getting the performance you want
2. You need to be the CEO of the airplane
Move around
Stay in Trim (flying hands off)
Navigation
Radio
3. Think infront of the airplane
5T'
- Turn to course heading
- Time - Start your time
- Twist - Tune Radios/Twist CDI
- Throttle - God Down or Slow Down (Fuel, power, Mixture)
- Talk - Report to ATC
Performance
Weight and balance
Graph
off load some fuel,
stability - forward CG manuever impact - stall
step
who you get on a spin
shortness runway - clear obsticles
Graph - temp ref line down to weight ref line down to headwind /crosswind
Pressure Altiude
if pressure is 30.20 have the effect of lower the field elevation
Adverse condition: higher elevatoin - more weight, higher altitude, higher temperature, Tail wind
hight elevation - lean mixture,
65% power - what standard temp laps rate
true airspeed - manufacture publish it
Airspeed -
Fuel consumption
Fuel reserve altinate
Cross Country
flight plan to destination
VFR checkpoints Pilotage use Vor to cross reference
checkpoints - visuable
which will not work at night .. river
use VOR
Airports
Lighting L* lighting
Altitude pic trip
Decision on altitude for trip- cealing, AGL MSL
lowest you can fly 1000' above grown obsticle MSL MSA minumum safe Altitude
Visubility - poor vilibility
The instrument rating is an excellent addition to any pilot certificate, whether you are looking to become a professional pilot or are just a weekend warrior. This rating adds an unparalleled level of safety by sharpening a pilot’s proficiency and lessening the risks associated with unexpected adverse weather conditions.
Privileges
Operate as Pilot in Command in instrument meteorological conditions (weather that is below required flight conditions for visual flight)
Requirements (Part 61)
Cost
There are a number of variables that can affect the total cost of instrument training and therefore the following breakdown is only an estimate. This estimate assumes the candidate has already fulfilled approximately 40 of the 50 hours of cross-country Pilot-in-Command time required to obtain this rating. Please note that this breakdown is based on our Bedford rates (with the exception of the simulator charges) and will vary between locations. Additionally, this estimate should provide you with an idea of virtually all of the costs associated with obtaining this rating. We have established this estimate using a fairly conservative approach to avoid unexpected expenses. If you have questions regarding how our pricing differs from the pricing of our competitors please feel free to contact us!
| Instrument Rating Cost Breakdown | Warrior II/C172M | Warrior III | C172 G1000 |
| Dual Flight (25 Hours) | $ 5,375 | $ 5,625 | $ 5,875 |
| Dual Simulator (15 Hours) | $ 1,650 | $ 1,650 | $ 1,650 |
| Ground Instruction (5 Hours) | $ 350 | $ 350 | $ 350 |
| Books / Supplies (Approximate) | $ 114 | $ 114 | $ 114 |
| FAA Written Exam | $ 150 | $ 150 | $ 150 |
| FAA Practical Test (Examiner Fee) | $ 450 | $ 450 | $ 450 |
| FAA Practical Test (Aircraft Rental Approx. 1.5 Hours) | $ 233 | $ 248 | $ 263 |
| Total | $ 8,322 | $ 8,587 | $ 8,852 |
References: 14 CFR 61.51, 14 CFR 61.189, AC 61-65
Logbook entries are made to serve as a record of training time and aeronautical experience. 14 CFR 61.189 requires flight instructors to sign the logbook (in a legible manner) of each person to whom flight or ground training is provided. 14 CFR 61.51 specifies what information must be entered when the training is logged. Flight instructors are not required to keep records of signed logbook entries.
Endorsements mark and formalize events such as obtaining solo operating privileges or taking a practical test. According to the Aviation Instructor’s Handbook, whether to endorse a pilot for these privileges is the flight instructor’s primary legal responsibility. 14 CFR 61.189 specifies the records that flight instructors must keep after giving an endorsement.
Example: After an unsuccessful flight review, the flight instructor must sign the logbook to show the ground and flight training provided; however, no endorsement (privilege) is given.
Related:
Reference: AC 61-65
Instructors may need to customize an endorsement due to an applicant’s particular circumstances or changes in regulatory requirements. All endorsements should be worded as closely as possible to the examples provided in AC 61-65.
Every training endorsement should cite an appropriate reference to 14 CFR Part 61. Careful attention should be placed on the regulations and paragraphs cited in the endorsement to reflect the type of training completed (e.g., ASEL or AMEL).
Instructors may place additional restrictions on an endorsement, such as:
References: 49 CFR 1552.3, 49 CFR 1552.25, AC 61-65
Note: The TSA endorsement is located in the student pilot section of AC 61-65 but applies to any initial pilot certificate or additional rating.
To meet the Transportation Security Administration’s (TSA) record-keeping requirements, the flight training provider or flight instructor must do one of the following:
Applicable Endorsement:
Related: Transportation Security Administration: Citizenship Verification
References: 14 CFR 61.87, 14 CFR 61.89, 14 CFR 61.93, 14 CFR 61.94, 14 CFR 61.95, 14 CFR 61.195, AC 61-65
Student Pilot certificates are issued without category and class ratings. Operating privileges and limitations for solo flights are conveyed exclusively through endorsements.
Instructors commonly include weather limitations that are more restrictive than the requirements of 14 CFR Part 61 for student pilots.
Applicable Endorsement:
Student pilot endorsements are always made for a specific make (e.g., Cessna) and model (e.g., 172) of aircraft. These endorsements do not include the series variation (year model) of that make and model of aircraft.
Flight instructors may provide flight training to a student pilot in a similar make and model. For example, a student pilot who normally receives flight training and is endorsed for solo flight in a Cessna 150 can also train with his or her instructor in a Cessna 152 (a similar model). As long as the student pilot demonstrates proficiency and safety, the Cessna 152 can be used to complete the maneuvers and procedures required by 14 CFR 61.87.
Student pilots are initially limited to a 25 NM radius after being endorsed for solo flight.
Any solo flight beyond 25 NM requires:
Each flight beyond the 25 NM radius requires an instructor to review the student pilot’s planning and preparation for the entire route of the flight and at the airport(s) of intended landing. The instructor must sign an endorsement (#10 in AC 61-65) attesting that the preparation is correct and that the student pilot is prepared to make the flight safely under the known conditions. The endorsement is valid only on the specified date.
The instructor who provides the preflight planning endorsement is not required to be the student pilot’s primary instructor. For example, a student pilot may encounter unforecast weather problems and need to stay overnight at another airport. In this case, the student will need another endorsement for the return cross-country flight. A local instructor may review the student pilot’s planning and provide an endorsement.
Note: An exemption is provided in 14 CFR 61.93 for repeated flights to another airport within 50 NM from the originating airport. The student pilot must have an endorsement authorizing the flights (#11 in AC 61-65).
#3 – Presolo aeronautical knowledge: 14 CFR 61.87(b)
#4 – Presolo flight training: 14 CFR 61.87(c)(1) and (2)
#5 –Presolo flight training at night: 14 CFR 61.87(o)
#6 – Solo flight (first 90-day period): 14 CFR 61.87(n)
#7 – Solo flight (each additional 90-day period): 14 CFR 61.87(p)
#8 – Solo takeoffs and landings at another airport within 25 NM: 14 CFR 61.93(b)(1)
#9 – Solo cross-country flight: 14 CFR 61.93(c)(1) and (2)
#10 – Solo cross-country flight: 14 CFR 61.93(c)(3)
#11 – Repeated solo cross-country flights not more than 50 NM from the point of departure: 14 CFR 61.93(b)(2)
#12 – Solo flight in Class B airspace: 14 CFR 61.95(a)
#13 – Solo flight to, from, or at an airport located in Class B airspace: 14 CFR 61.95(b) and 14 CFR 91.131(b)(1)

Reference: 14 CFR 61.39
To be eligible for a practical test, an applicant must have an endorsement, if required, in his or her logbook or training record that has been signed by an authorized instructor who certifies that the applicant:
Applicable Endorsements:
Note: These endorsements are often combined, such as with the instrument practical test endorsement (#40 in AC 61-65).
The two endorsements are not required if the applicant:
The knowledge test endorsement (#2 in AC 61-65) is not required if: